Flash, debug and test serial console on Ubuntu 22.04
NXP’s S32 Design Studio for ARM can be used to flash and debug your image while it is running on the S32K148 development board.
Install S32 Design Studio for ARM
To download and install this you will first need to register for a free account with NXP. Note that free activation codes for software you download will be sent to the email account you register with. Once registered, you can download S32 Design Studio for ARM from here.
Download the linux installer S32DS_ARM_Linux_v2.2.bin.
Please note that the linux installer’s instructions only specify very old versions of linux as supported. The most recent version of Ubuntu listed as supported is Ubuntu 16. However, it has been successfully installed on the Desktop version of Ubuntu 22.04 and the steps to achieve this are described below. Note this assumes you have already set up the build environment described in Set up build for S32K148 platform on Ubuntu 22.04.
Install prerequisites for S32 Design Studio on Ubuntu 22.04
Install 32-bit compatibility libraries
sudo dpkg --add-architecture i386
sudo apt-get update
sudo apt-get install lib32z1 libncurses5:i386 libstdc++6:i386 libbz2-1.0:i386 libc6:i386 libx11-6:i386 libxpm4:i386 libusb-0.1-4:i386
Install JRE 1.8 and JavaFX
sudo apt-get install openjdk-8-jre openjfx
Install Webkit1 for GTK2
For this, you will need to add an older ubuntu package repository by editing sources.list …
sudo nano /etc/apt/sources.list
Add this entry to sources.list and save it…
deb http://cz.archive.ubuntu.com/ubuntu bionic main universe
Then run…
sudo apt-get update
At this stage you will see this error…
Err:4 http://cz.archive.ubuntu.com/ubuntu bionic InRelease
The following signatures couldn't be verified because the public key is not available: NO_PUBKEY 3B4FE6ACC0B21F32
To solve this run the following command where the last HEX string corresponds to that returned to you in the above error…
sudo apt-key adv --keyserver keyserver.ubuntu.com --recv-keys 3B4FE6ACC0B21F32
Then re-run…
sudo apt-get update
This should succeed without the above error, and finally, install the library…
sudo apt-get install libwebkitgtk-1.0-0
Install TCL
sudo apt-get install tcl
Install Python 2.7 32-bit
sudo apt-get install libpython2.7:i386
Install the unix2dos utility
sudo apt-get install tofrodos
Install S32 Design Studio on Ubuntu 22.04
With all the above prerequisites installed, your Ubuntu system is now ready to install S32 Design Studio itself. In a command shell, in the directory where you downloaded the linux installer, run it…
./S32DS_ARM_Linux_v2.2.bin
The splash screen for S32 Design Studio should appear, the installer will bring you through install options (you can leave all the install options at their default values).
Pay attention to the terminal window where you have started the installer. The installer will make at least one sudo call, which may re-request your password if the sudo password timeout has expired.
If the installer terminates before showing the splash screen due to its inability to find Java VM or if an incompatible Java VM is used, causing runtime errors, the path to the proper VM can be specified in the command line using the LAX_VM option:
./S32DS_ARM_Linux_v2.2.bin LAX_VM /usr/lib/jvm/java-8-openjdk-amd64/bin/java
Enter the activation code received by email when prompted and chose Activate Online and allow the installer to complete.
If the activation fails, one of the possible reasons for this is incorrect access permissions for the /usr/local/share/macrovision directory created by the installer when a non-default umask is set for the root user in the system. In a command shell, run the following command:
sudo chmod -R o+rx /usr/local/share/macrovision
Then repeat the activation.
Before launching S32 Design Studio, there is one more installation issue to be fixed…
Fix error in installation of P&E Micro USB driver on 64-bit Ubuntu
In order for S32 Design Studio to successfully find your S32K148 development board via USB, a driver installation issue needs to be fixed. See https://community.nxp.com/t5/S32K/OpenSDA-s32k144evb-Linux-Ubuntu-20-04-port-not-found/td-p/1050057
The problem is that the installer puts the P&E Micro USB driver in the wrong directory on 64-bit systems. The simple fix is to put it in the right directory. Assuming you have installed S32 Design Studio in the default location ~/NXP/, run the following command:
sudo cp ~/NXP/S32DS_ARM_v2.2/Drivers/PnE/drivers/libusb_64_32/libp64-0.1.so.4 /usr/lib/
Launch S32 Design Studio
The installer should have created a shortcut in a subfolder on your Ubuntu Desktop named NXP S32 Design Studio / S32 Design Studio for ARM Version 2.2.
Double-click on the shortcut S32 Design Studio for ARM 2.2 to launch it. An S32DS Extensions and Updates window should appear indicating if there are updates available - if so, install these.
If the S32 Design Studio crashes, it may happen because it is run with an incompatible version of JVM. Check the output of:
java -version
If it doesn’t show openjdk version “1.8.0_422” (or similar build of openjdk 1.8), this is likely the case. You may use the following interactive command to change the default version of the JRE globally in your system:
sudo update-alternatives --config java
(that will change the final target of the /usr/bin/java symlink), or you may modify your PATH environment variable so that the /usr/lib/jvm/java-8-openjdk-amd64/jre/bin/ is searched first.
Flash and debug in S32 Design Studio for ARM
Assuming you have a S32K148 development board and it is connected to your PC via USB, then you can flash your image on the board and debug over USB. You can create a dummy project in S32 Design Studio for ARM in the default workspace and then change it to point to the external code and the image created as described in Set up build for S32K148 platform on Ubuntu 22.04.
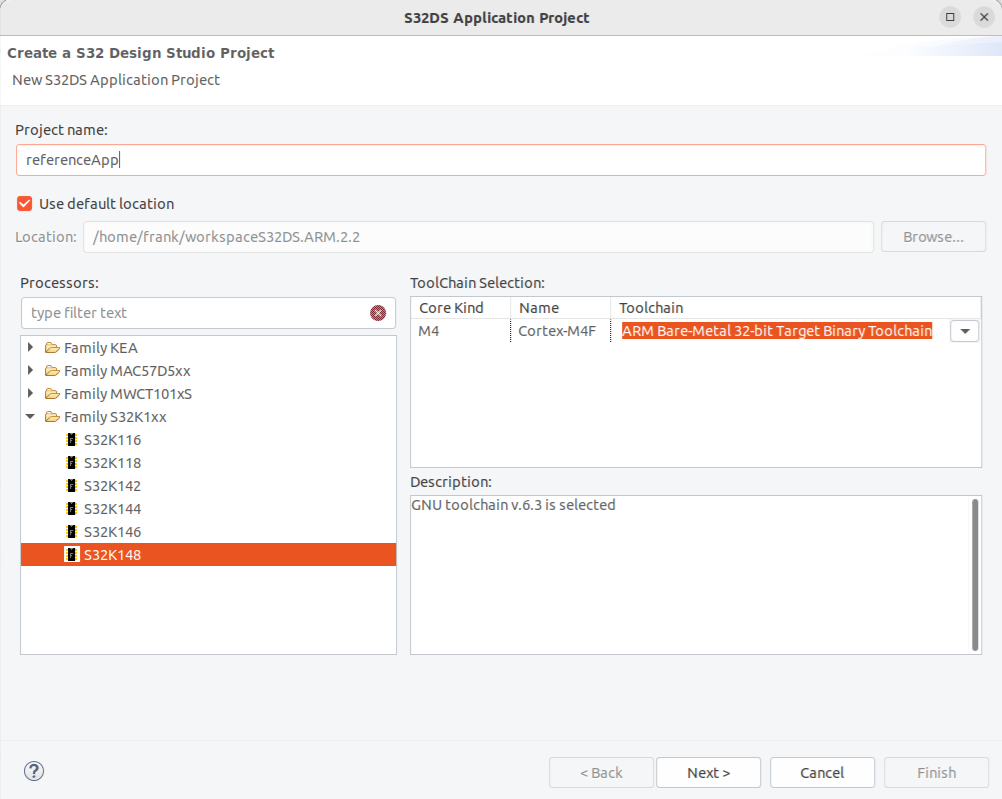
In S32 Design Studio choose File -> New -> S32DS Application Project, select the processor Family S32K1xx -> S32K148 and give the project a name. eg. “referenceApp“. You can leave all other settings at their default values.

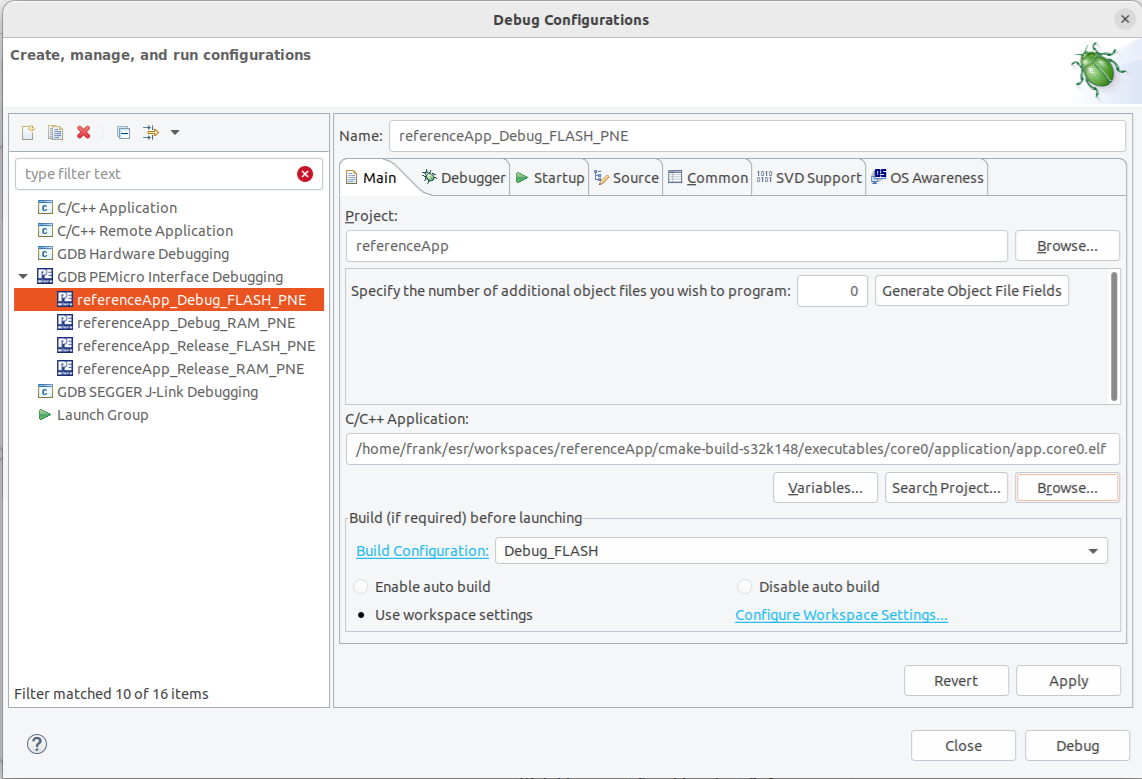
In Run -> Debug Configurations find GDB PEMicro Interface Debugging-> referenceApp_Debug_FLASH_PNE. In the Main tab set the C/C++ Application to the .elf file you should have already built as described in Set up build for S32K148 platform on Ubuntu 22.04. Enter the absolute path to the .elf file…
[absolute_path_to_project_root]/cmake-build-s32k148/application/app.referenceApp.elf

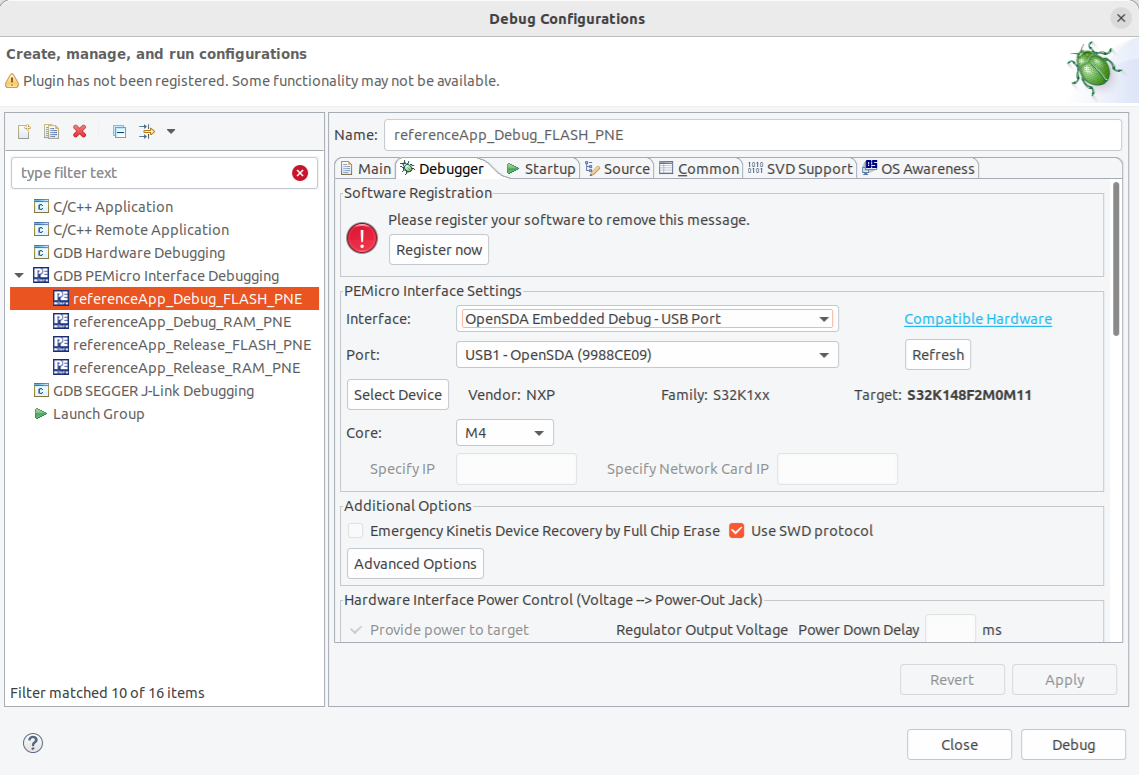
In the Debugger tab, in the Interface: field select
OpenSDA Embedded Debug - USB Port. The Port: field should then be populated with an instance representing the target board connected to your PC via USB. If nothing appears in the Port: field you can try pressing Refresh or power cycling your target board. If the target board is not found then you cannot continue until this is resolved.
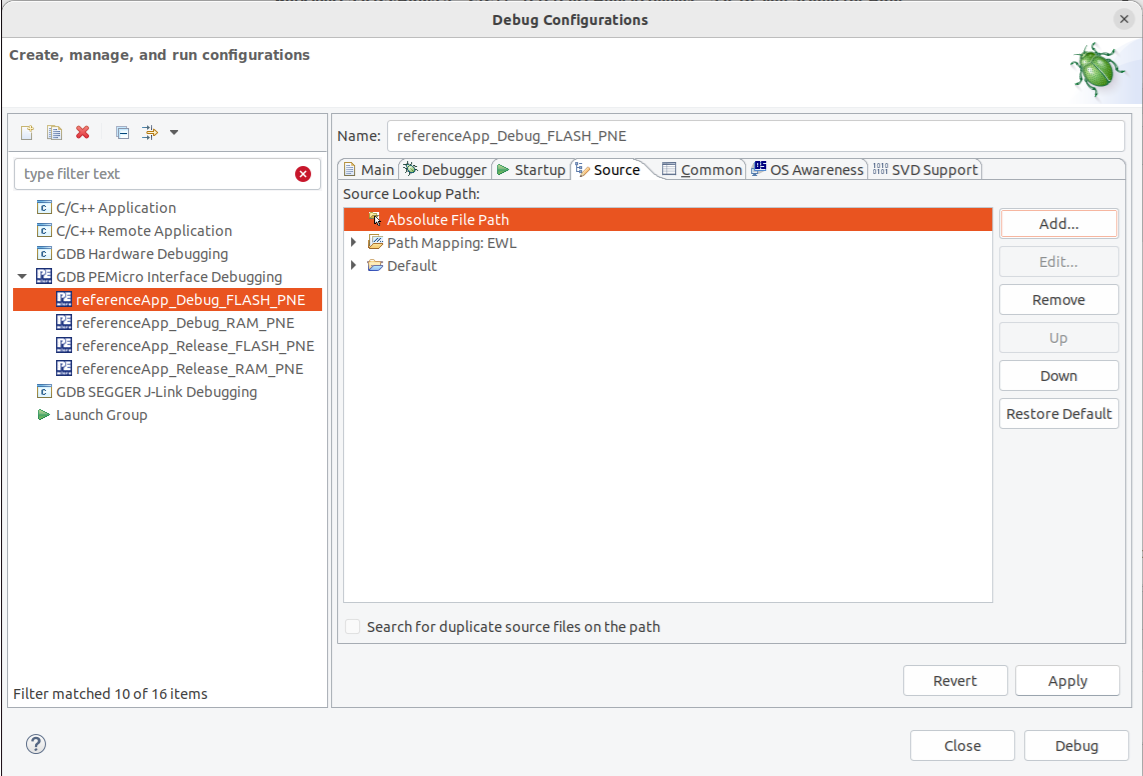
In the Source tab select Add… -> Absolute File Path.

If the above steps are successful then press the Debug button, this flashes app.referenceApp.elf to the target board and starts the debugger, it halts at the entry point in main(). At this point you can single-step through the code, or press the Resume button to run the software. Once flashed you can power-cycle the target board without the USB connection and it will run the software.
Test the Serial Console
The application running on the board uses the serial port for logging messages and to implement a command console,
which can be interacted with in parallel to debugging over the same USB cable.
This will appear as a TTY device in linux. eg. /dev/ttyACM0.
In order to test this you need serial port terminal software to connect to the COM port.
minicom is one example of such software - you can install this as follows…
sudo apt install minicom
The serial port parameters for the board with the software running are as follows…
Speed |
Data |
Parity |
Stop bits |
Flow control |
|---|---|---|---|---|
115200 |
8 bit |
None |
1 |
None |
Assuming the serial port is assigned to the device /dev/ttyACM0 then you can connect with minicom as follows…
sudo minicom -D /dev/ttyACM0 -b 115200
If the target board is powered and the software you built and flashed on the board is running then you should see output from it printed to the console,
and if you type help you should see the commands available printed out, like this…
14: RefApp: LIFECYCLE: INFO: Run level 8
14: RefApp: LIFECYCLE: INFO: Run sysadmin
14: RefApp: LIFECYCLE: DEBUG: Run sysadmin done
15: RefApp: LIFECYCLE: DEBUG: Run level 8 done
1022: RefApp: DEMO: DEBUG: Sending frame 0
2022: RefApp: DEMO: DEBUG: Sending frame 1
3022: RefApp: DEMO: DEBUG: Sending frame 2
4022: RefApp: DEMO: DEBUG: Sending frame 3
help

adc         - Adc Console
   all       - Print All Adc
   get       - startChannel ChannelNr [stopChannel ChannelNr]
   allx      - all scaled adc
help        - Show all commands or specific help for a command given as parameter.
lc          - lifecycle command
   reboot    - reboot the system
   poweroff  - poweroff the system
   udef      - forces an undefined instruction exception
   pabt      - forces a prefetch abort exception
   dabt      - forces a data abort exception
   assert    - forces an assert
pwm         - Set PWM
   all       - print all channel numbers and names
   set       - channel[0-9,0xFF=all] duty[0=off|10000=100%]
   setPeriod - channel[0-9] period[microsec]
stats       - lifecycle statistics command
   cpu       - prints CPU statistics
   stack     - prints stack statistics
   all       - prints all statistics
ok

> 4339: RefApp: CONSOLE: INFO: Received console command "help"
4436: RefApp: CONSOLE: INFO: Console command succeeded
5022: RefApp: DEMO: DEBUG: Sending frame 4
6022: RefApp: DEMO: DEBUG: Sending frame 5
At this point, you can build the code, flash it on the board and debug it. You can now explore the code, make your own changes and learn how it works.