Add SocketCAN support in WSL
If you have followed the steps in Set up build environment for POSIX platform on Windows then you should now have an environment in which you can build and run the POSIX platform executable and this enables experimentation and learning through making your own changes to the codebase.
But note that by default, the linux kernel used in WSL does not support CAN.
If you wish to develop some CAN based functionality while working in WSL
then you need to enable CAN support in the kernel used by WSL.
Linux also supports Virtual CAN adapters (vcan) which allow CAN applications to be developed without CAN hardware
and the POSIX build will use this if supported by the host platform.
Below are instructions to enable this functionality in WSL.
Before attempting this, in a Windows command shell with administrator rights confirm WSL2 as default version…
wsl --set-default-version 2
The steps below assume you have WSL2 and Ubuntu-22 set up as described in Set up Ubuntu 22.04 in WSL.
Update your existing Ubuntu distribution and install the tools needed to configure and build the kernel…
sudo apt update
sudo apt install build-essential flex bison libssl-dev libelf-dev libncurses-dev pkg-config bc dwarves
Just for background information, note that WSL uses a single linux kernel
and if you have multiple distributions (eg. Ubuntu-18.04, Ubuntu-22.04, Debian, etc.)
they will all use the same kernel provided by WSL.
In the instructions below you will not be replacing your existing Ubuntu-22.04 distribution,
you will be replacing the kernel it is using with a custom kernel that you will build.
The distribution and the kernel need to be compatible,
so the first thing you need to do is check what version of linux kernel is currently running by executing uname -r…
frank@C11-JQXQXCRB1VG:~$ uname -r
5.15.153.1-microsoft-standard-WSL2
In the WSL2-Linux-Kernel project in github
find the branch name that matches the first two numbers of your kernel.
For the case above, the matching branch is linux-msft-wsl-5.15.y.
Clone the WSL kernel repo and checkout the matching branch…
git clone https://github.com/microsoft/WSL2-Linux-Kernel
cd WSL2-Linux-Kernel
git checkout linux-msft-wsl-5.15.y
You need to configure the kernel before building it. You can take the current kernel’s configuration as the starting point…
cat /proc/config.gz | gunzip > .config
The following command instructs the build system to prepare the kernel source tree (make prepare)
and prepare it for building external modules (modules_prepare)…
make prepare modules_prepare
Next, launch the configuration interface so that you can choose the CAN-related features needed…
make menuconfig
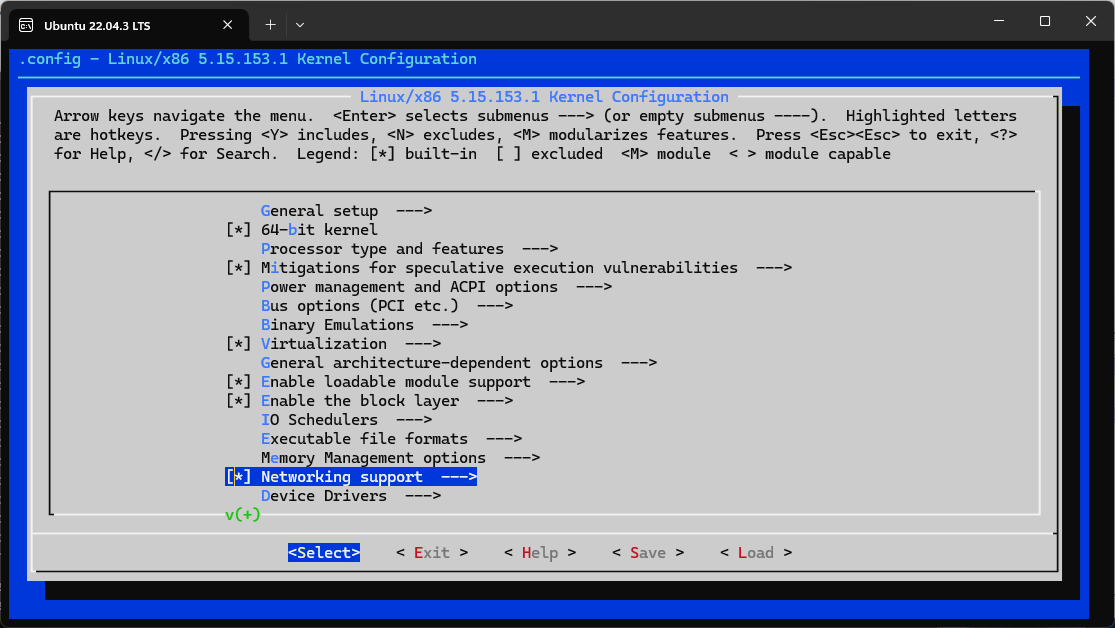
Navigate to Networking Support as shown below…

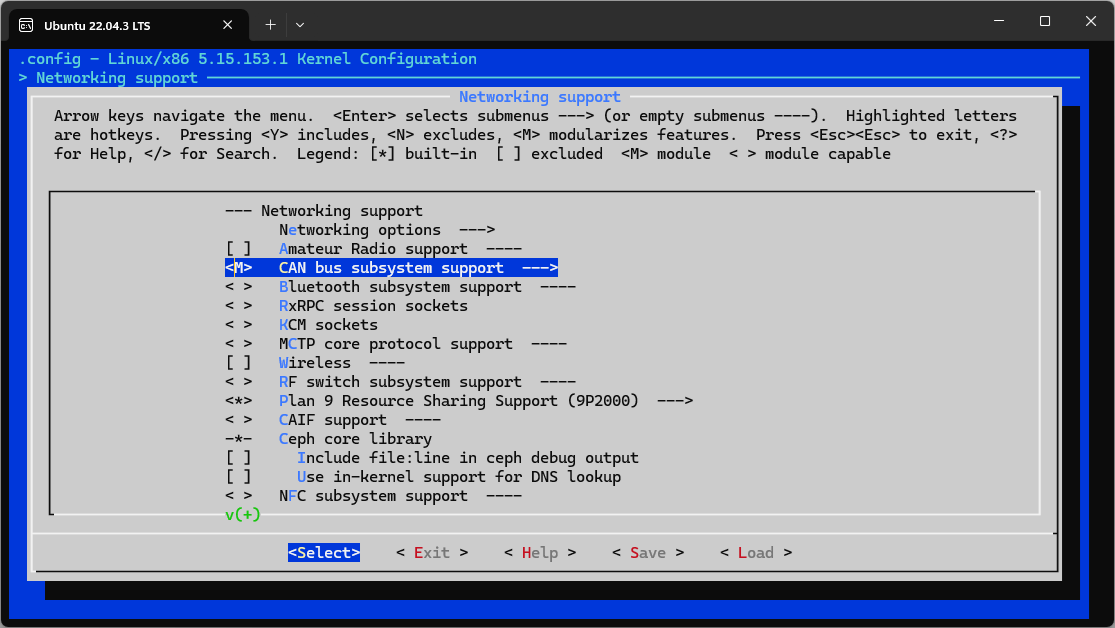
Press Enter to enter its sub-menu, then navigate to CAN bus subsystem support
which is empty by default - press M to select it.

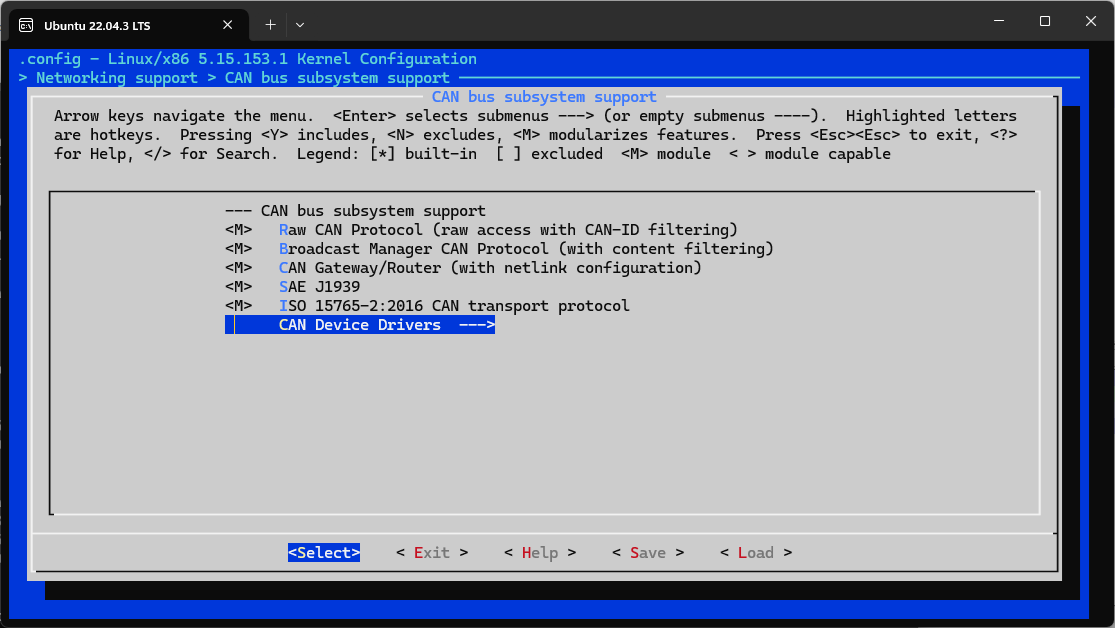
Then, while still on CAN bus subsystem support press Enter to enter its sub-menu.
You can press M on each item listed to include them all as shown below,
then navigate to CAN Device Drivers…

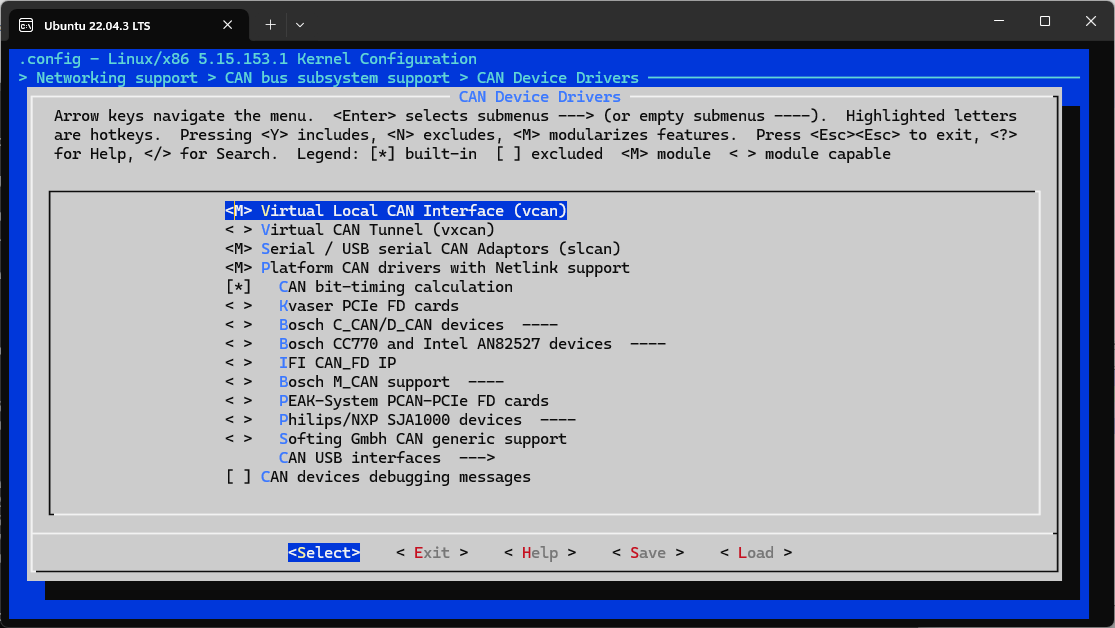
and press Enter to enter its sub-menu and press M for each of the items shown as selected below
and set CAN bit-timing calculation to *…

When finished making configuration changes, Save and Exit. This will write a new .config file.
Now you can build your custom kernel and modules…
make -j4
make modules
sudo make modules_install
The newly built kernel should be found in the current directory (at the base of the WSL kernel git repo clone) as a file named vmlinux.
You need to put this file in a Windows directory and tell WSL to use it at startup.
eg. Make a directory in your C: drive named wsl_custom and from Ubuntu copy the built kernel there…
cp vmlinux /mnt/c/wsl_custom/
Create a file named .wslconfig in your Windows user directory (eg. C:\Users\username\.wslconfig) containing…
[wsl2]
kernel=C:\\wsl_custom\\vmlinux
To use the new kernel you need to restart WSL (by running wsl --shutdown or restarting you laptop and starting Ubuntu again).
After this, every time WSL starts it will load your custom kernel.
Each time WSL starts you will need to load the CAN kernel modules…
sudo modprobe can
sudo modprobe can-raw
sudo modprobe vcan
Then you can create a virtual CAN device as follows…
sudo ip link add dev vcan0 type vcan
sudo ip link set vcan0 mtu 16
sudo ip link set up vcan0
If this all works you should see vcan0 listed as a network interface. For example, ifconfig should show…
vcan0: flags=193<UP,RUNNING,NOARP>  mtu 16
        unspec 00-00-00-00-00-00-00-00-00-00-00-00-00-00-00-00  txqueuelen 1000  (UNSPEC)
        RX packets 0  bytes 0 (0.0 B)
        RX errors 0  dropped 0  overruns 0  frame 0
        TX packets 0  bytes 0 (0.0 B)
        TX errors 0  dropped 0 overruns 0  carrier 0  collisions 0
You can install SocketCAN utilities…
sudo apt install can-utils
and then use the Virtual CAN interface vcan0 with these. eg. In one Ubuntu shell run…
candump vcan0
and at the same time, in another Ubuntu shell run…
cansend vcan0 321#AABBCCDDEEFF
The above command sends a CAN Frame with ID = 0x321 and 6 bytes of data 0xAABBCCDDEEFF to vcan0.
You should see it in the output from candump vcan0 like this…
vcan0 321 [6] AA BB CC DD EE FF
For a description of how to use your POSIX platform build with a Virtual CAN interface, see Working with CAN.